
At the beginning Hours was a very small and simple application that I've set up to learn how to write code for the Palm Computing Platform and to help me to keep track of my working hours as i was in my first practical semester. After half a year of coding and rewriting the whole application for about two times it has become a stable and fully functional software for Palm OS compatible PDAs. The current version supports HandEra's and Sony's high resolution screen as well as the colored display on new devices running the Palm OS.
The idea behind this application is to help people in keeping track of
time; something like the built-in Datebook application. You
may say that there are already such applications. Yes, they are.
However, I haven't found any being freeware or even Open
Source. Further Hours manages more then one database at a
time. This is very useful if you got two jobs or two or more projects
running at the same time and you need to write down when and what you
have done for these projects.
As handhelds are regarded as satellite devices to help people write
down something quickly while one is not at the PC there is a need to
transfer the data form handheld to the PC. This task is greatly
covered by tools like the Hot-sync manager, the pilot-link
package and other synchronizing utilities. After a long time
troubling with conduits and the Hot-sync manager I've decided to build
a small converter, which is a small program running on the PC
independent of the synchronizing utilities, to make data generated by
Hours readable to PC applications as Excel, StarOffice or
others.
WARNING: While every effort has been made to find and remove
bugs from Hours, it is still under active development. You
use it at your own risk! Since Hours is still under active
development, there may be bugs which will cause your PDA to crash to
the point where a hard reset is required. (Hard resets cause loss of
all data on the PDA.)
http://hours.sourceforge.net is the official web page for the application. You will find information, latest news and also latest releases. If you want to be noticed about new releases you will need to subscribe to the mailing list which you will also find at the given URL. You will find there also a public forum which is used to discuss wanted features and bugs.
The official projects web page is http://sourceforge.net/projects/hours which is intended mainly for developers.
By tapping on the name of a database you can open it and find yourself on the DATABASEFORM which we will look at a little bit later.
Tapping on the ``star'' of an item on the MAINFORM will open up a small menu giving you the chance to perform a certain task with the appropriate database. Beside of opening, renaming, duplicating or beaming the database you can open the details dialog for the database. There you may set the category for the database and set its private state. Items marked ``private'' can be masked or hidden from view depending on the settings in the security application. Further you can delete the database from this dialog. But note that after deletion of a database the data is lost and cannot be recovered! So be careful with this. Also in the popup menu there is an item reading ``Information'' to pop up an INFORMATIONDIALOG which will be described later in detail.
So after being a little bit familiar with the MAINFORM let's talk about the different database version that I've mentioned earlier.
Do you remember the ``Income tracking'' option when creating a new database by tapping on the ``New'' button on the MAINFORM? Well, if the option is checked a V18 database will be created and if not a V16 will be the result. At the time of this writing there is no possibility to create directly a V15 database. However, right after the creation you can convert the fresh database into a V15 format.
Once I had a discussion why troubling with the three formats. One could simply ignore the fields for the ``Income tracking'' if they are not needed. However, I decided against it, because V15 records need less bytes then V18 and thus can save unused memory. So this type of database is still there if one needs to keep track only of a (date,begin,end) triple per record.
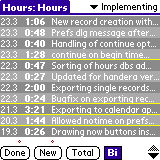
In the captions of the form you will find always ``Hours:'' plus the database name. If the name is too long to be displayed it will be shortened.
After having some entries (records) in a database you will see five or
six columns by default depending on the version of the database.
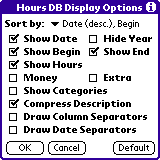
You need to check out the ``Display Options'' to customize the view
(described later).
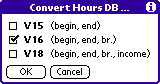
The ``Convert...'' item will pop up an dialog as shown in figure 4. When this dialog appears the current version of the database is checked. Checking a different one and tapping ``OK'' will convert the database into a new format. Note that when converting to a smaller version a part of data will get lost! So be careful with that. When you convert to a greater version the new fields will be filled with zero values!
Here is a very small description of the CSV format. In a
comma separated value each record should be stored in one line
separately. The records field are separated by a special character
called ``separator''. This may be a semicolon, a blank, a tab or
whatever else. A correct part of such a file may look like in figure 5
where the record fields are separated by a blank.
...
3.7.01 08:30 17:30 a_long_hard_day
4.7.01 10:13 11:02 coffee_with_mark
5.7.01 19:37 00:02 eating_pizza :-)
...
Now imaging that the fields are separated by a semicolon (;).
Then the example would look like in figure 6.
...
3.7.01;08:30;17:30;a long and hard day
4.7.01;10:13;11:02;coffe with mark
5.7.01;19:37;00:02;eating pizza :-)
...
You can see that while semicolon is the separator the text in the last field may contain blanks that are not interpreted as separators. That's why Hours uses semicolons as field separators.
Now let's come to a possible problem. The above mentioned
``Export'' function produces a memo (record in the Memo
application) in CSV format as
described above. There is only one problem that may occur. Each record
contains the description of the record as the last field. If the
description contains an ``new line'' character or a semicolon the CSV
format may contain little flaws. But you may correct this quickly with
your favorite editor on the desktop or even in the memo application
on your PDA. If you are using the converter tools provided with
Hours you do not need to care about this because the
converter handles this for you.
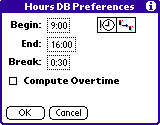
For now let's forget about the ``Compute Overtime'' option, we'll look at this later. Just look at the controls above the check box. When you tap the ``New'' button to create a new entry Hours will pre-fill the record's fields with values that you may specify. In the preferences dialog you can specify the default begin and end time by simply tapping the appropriate selector triggers. Note that none of the icon rectangles must be checked as it looks in figure 8.
If you want Hours to fill automatically the begin field of a new record with the current time (when you tapped the ``New'' button) you need to activate the icon rectangle displaying a clock like shown in figure 9.

If this icon is inverted it means that it is activated. You will notice that the selector trigger for the default begin time will disappear and a check box reading ``relative'' beside the default end time will appear. Tapping the now icon again will deactivate it and restore the previous state.
Hooking the ``relative'' option will cause Hours to set the end time n hours later as the begin time. For example, if you set the default begin to ``now'' and end time to ``4:00 relative'' and you create a new record at 12:21 its end time will be automatically set to 16:21.
The other icon shown in figure 10 is responsible for the ``continuing begin time''. This option will also fill the begin field with a special value. Before you create a new record this options looks for the first record in the database list and compares the current date with the found record's date. If they equal the found record's end time will be the new record's begin time. If they differ the current time will be assigned as the new record's begin time. To make this feature work correctly you'll need to set the sort order of the database to ``Data/Begin(desc.)''!

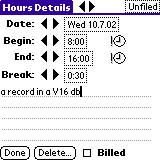
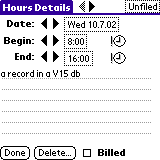
On databases of version greater or equal to V16 there is also a selector trigger for the default break. On databases of version V18 you can set the currency by entering a maximum of three characters or choosing one from the pop up list by tapping on the arrow beside the field. On V15 databases these controls will be missing.
So what's about the ``Compute Overtime'' feature? Well, you surely remember that the ``Total'' button which pops up a small window computes the total sum of hours. Hours can compute how much overtime or minus hours you have if you tell it how many hours should be assumed per one entry in the list. Checking the option will cause a selector trigger to appear where you need to enter the hours. Let me explain this on an example. Let's assume that a database has the following entries where the first column is the begin time, the second column shows the end time and the third column computes the hours for that entry. So you will see something like the following list.
08:00 16:00 08:00
09:00 12:00 03:00
07:30 18:00 10:30
Now let's compute the overtime assuming that we should have had 7:00 hours per entry. As there are 3 entries we should have had 21:00 hours but there are 21:30. So we have half an hour of overtime. This computation takes place when you have the ``Compute Overtime'' option checked and you tap on the ``Total'' button on the DATABASEFORM. Once again, note that in the current versions of Hours this computation takes place on a ``per entry'' basis. Future versions should support the computation on a ``per day'' or even ``per week'' basis.

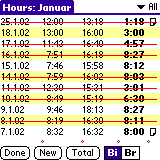
As you can remember the ``Information dialog'' can be launch from MAINFORM or the DATABASEFORM. This dialog as shown in figure 11 gives you a fundamental summary of a database.
In the first line you will read the full name of the database as it is referenced by the Palm Operating System. The second line gives the full size of the database in bytes. The ``Recs'' field reads the total number of records in a database where ``Billed'' shows the number of ``billed'' records. In figure 11 there are for example two records in that database where one is marked ``billed''. Followed by that information there are three ranges showing you the appropriate hours/money values. The second column which reads always ``[Br]:'' shows you the values with breaks subtracted. On databases with no ``income'' support the money values simply are not there.
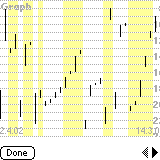
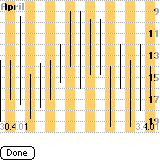
As you may see there is nothing special about this view. You can see the records as vertical lines showing you the hours. As you may notice in figure 12 the background marks one day. You can see in the left picture that there is sometimes more than one record on the same background column. These records share the same date. By tapping into the graph you can select a line. It will be highlighted and a small description of it will be popped up at the top of the graph. Tapping into this description will bring you directly to the HOURSDETAILSFORM of that entry. By the way, the background colors are taken from the ``Table Colors'' dialog where ``Row One'' and ``Row Two'' specify the backgrounds.
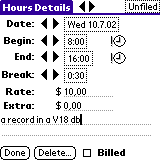
As already discussed a V18 record has an additional field for the wage (rate) and the extra money. There is something special about the rate field, which we will discuss in a while.
As on every database version there is a date, a begin and a end time
as well as a text field for a description. Note that this description
cannot exceed 1096 characters in length, but i think that this is more
than you would ever need. Well, some years back nobody thought of
needing over a 1 MB of RAM in his/her PC ... ;-) As you can see on
databases of version V18 and V16 there is also a
``Break'' field. By tapping on the dotted rectangle selector triggers
you can set these values via a dialog. The two ``clock'' icons stands
for ``Now'' and will enter the current time to the appropriate fields
when tapped. At the bottom you will find a check box to mark the
current record as ``billed''. For the date you can use the two
horizontal arrows to shift the date by one date. For the begin, end and
break time these arrows shift the time by five minutes by default;
note that the time is firstly shifted to a value that is dividable by
five. You can change this ``shift width'' in the
``Global Preferences ...'' dialog (see later).
Mostly, well, always when there is more than one record in the current database, there will appear two arrows in the caption of the form. By tapping them you will move to the next/previous record in the database, so avoiding a switching to the DATABASEFORM.
If you tap down the pen on the title of the form and hold it, the current time will be displayed instead of ``Hours Details''. This works exactly the same way as in the built-in Datebook application. If you lift up the pen not on the caption it will take Hours about one second to switch back to the old title.
On this form there is a hidden feature. As it happens that I accidentally create a new record with a long description in the wrong database I needed a way to move the record to a different database. Well, if something like that happens to you just tap into the right bottom corner of the form. Then there should appear a list of available hours databases. Selecting one will move the current record into that target database. This means that after moving, the record will be present only in the (new) target database!
So what's up with the rate field, as i mentioned above. Hours
tries to remember the last rate entered so it can fill that field when
a new record is being created. However this functionality is meanwhile
somewhat ... well, let's say extended. The concept as it is
implemented now stores the rate field related to the category of the
record. This means that there is one memory buffer for each category.
Changing the category will replace the rate field's current value with
the category's default rate. You may be asking now how you can set the
default rate for a category. Well, this happens automatically. Image
you have created a record and set the category of that record to ``A''.
By default the rate will be set to $ 10. Now enter a different value
for the rate and tap the done button so the rate you have
entered gets stored for that category. Now create a new record and
change the category of it to ``A''. The rate field should now read the
value you have entered before. This works for each category
separately and is of course database related. After having already
some records you have indirectly filled the memory buffers and the next
time you create a new record you do not need to enter the rate again
but simply change the category. Note that when you view the ``A''
category on the DATABASEFORM and tap the ``New'' button the
record's rate field will be automatically set to the stored valued for
this category. Note further that ``Unfiled'' is also a category. The
whole functionality is very useful and saves time when you store
records in one database with different rates. Imagine that you have
two jobs and one database called ``January'' where you store your
working hours. You will probably create two categories called ``Job
A'' and ``Job B''. Each time you create a record to store the working
hours for job ``A'' you need to switch the category and the rate field
gets updated. The same applies to job ``B''. The advantage is that
you don't need to enter the values by hand each time :-)
Beside standard menu items there is an ``Export'' menu item which can
copy the current record into the built-in DATEBOOK or
MEMO application. If you are a user of the DATEBK
application available for Palm OS you can export (copy) an record to
that application. All you need is to choose the appropriate rectangle
button and tap on the ``Yes'' button on the export dialog.
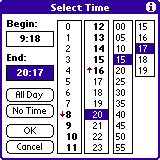
The currently selected time is always inverted like the begin time in figure 15. In the first two lists you can select the hours while the other two are used to select the minutes. By tapping on the ``No Time'' button the dialog will disappear and return the ``no time'' values to the caller. As you may see in the ``hours'' lists there are some of them drawn with bold font. They are also marked by two arrows showing you a direction of the time interval. This interval will be returned when you tap the ``All Day'' button. Remember from the ``Preferences'' dialog that you can set a default begin and default end time. These two values will be used to mark that ``All Day'' interval.
Of course you can use the graffiti to enter a time. To select for example 9:31 you need to write ``0931'' with the pen. To switch between the two times you need to write the next or prev keystroke.

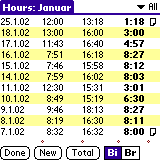
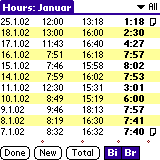
You surely can remember the ``Summary'' button on the MAINFORM (database list). Another form will appear giving you the possibility to quickly add hours from more databases together. As on the DATABASEFORM there are the two ``Bi'' and ``Br'' rectangle buttons which have the same meaning. Beside the those buttons there are three rectangles reading ``M'' (money column), ``H'' (hours column) and ``O'' (overtime column). Depending on the state of this buttons the appropriate columns are shown. The trick is that by tapping into the table you can mark an item and it will be added to the summary computation below the list. As you can see in figure 16 there are three items marked and you can also see the computation below the list. In this example there are 228:06 hours for the marked databases and a ``-2:54'' hours of overtime. Note that not all databases may support the overtime feature (to enable it you need to check the preference dialog of that database). Also not all database support the money feature (only database version V18).
Also note that at the end of the dialog there is the exact time of the compilation of the PRC.
You maybe wondering why there isn't a conduit. Well, this has the following reason. After troubles with the development of a conduit for a long time, i realized that there is a need to support also another operating systems like Linux. So writing once a ASCII program to do that conversion was the solution.
Currently there two such applications that perform the conversion. One written for Windoze using MFC and one written using ANSI C standard libraries. However the win32 application is not supported anymore and only the command line utility will be developed. However you can still use the h2csv.exe utility as the database formats have not changed since the time the utility was supported.
As already described the converters do nothing more than translate the backed up Hours databases into CSV format that many spreadsheet applications understand. All you need is to find the the appropriate Hours databases. After you've done a Hot-sync with your favorite synchronizing tool you need to find find files which end with ``-HRSH.PDB''. This means that backed up Hours database is represented on the desktop through a file named <database_name>-HRSH.PDB. On my Linux box the postfix is in lower letters.
For the detailed description of ``How to use the converter'' reference the README files distributed with the release packages.